Zotero : introduction to bibliographic reference management sofware
Section outline
-
This self-paced course will guide you through installing Zotero, exploring its interface, collecting bibliographic references, and managing them. You will also learn how to generate a bibliography with Zotero.
Learning objectives
- Install Zotero
- Understand its interface
- Collect references
- Manage references
- Manage notes, tags, search, sorting, and duplicates
- Import or export in BibTeX or RIS format
- Generate a list of bibliographic references
This course is freely accessible!
No account creation or registration is required. Enjoy the course!
-
Goals
- Understanding what Zotero can be used for
- Installing Zotero
- Checking if Zotero works on the computer I’m using
- Finding information in case of issues
-
Install Zotero
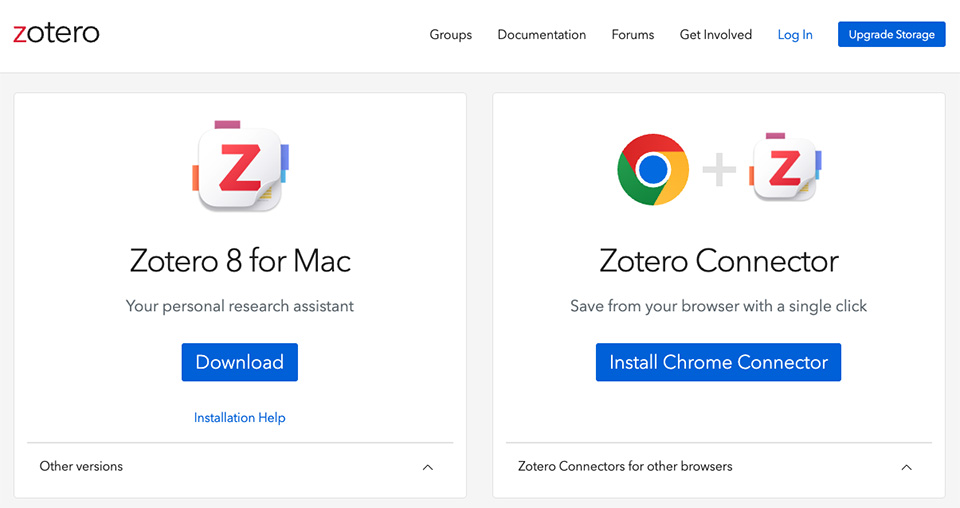
- Installation is a two-step process. First, install the software, then the connector.
- The download page detects your operating system. Whether you use Windows, Mac, or Linux, you will be offered the appropriate software. Zotero works with Firefox, Chrome, and Edge (you may encounter problems with Safari). There is now also a “mobile” version of Zotero.
- As with most software, the most recent version will be installed. Your operating system should support it, and the connector requires a recent/up-to-date version of your browser. Check the system requirements.
- Installation problems are very seldom encountered. If this should be the case, consult the forum, a friend, or, if necessary, contact your URFIST .
- You can create an online account on Zotero (not mandatory, but useful for later). You can, of course, open this account, but this step will not be necessary in this session.
-
Opening Zotero
On your computer
Once installed, open Zotero by clicking on the software icon.

Since you have not yet collected any references, the interface will be relatively "empty". You will explore the interface in detail in Chapter 2.
In the browser
Another important thing to check once the software and the browser connector are installed is the presence of a small Zotero icon in the top right corner of your browser.
Below is the Zotero Z icon as it appears when launching Firefox:

Depending on the browser, the icon may look different and you may not see a "Z" but rather a folder icon corresponding to the type of page or document displayed:

-
Goals
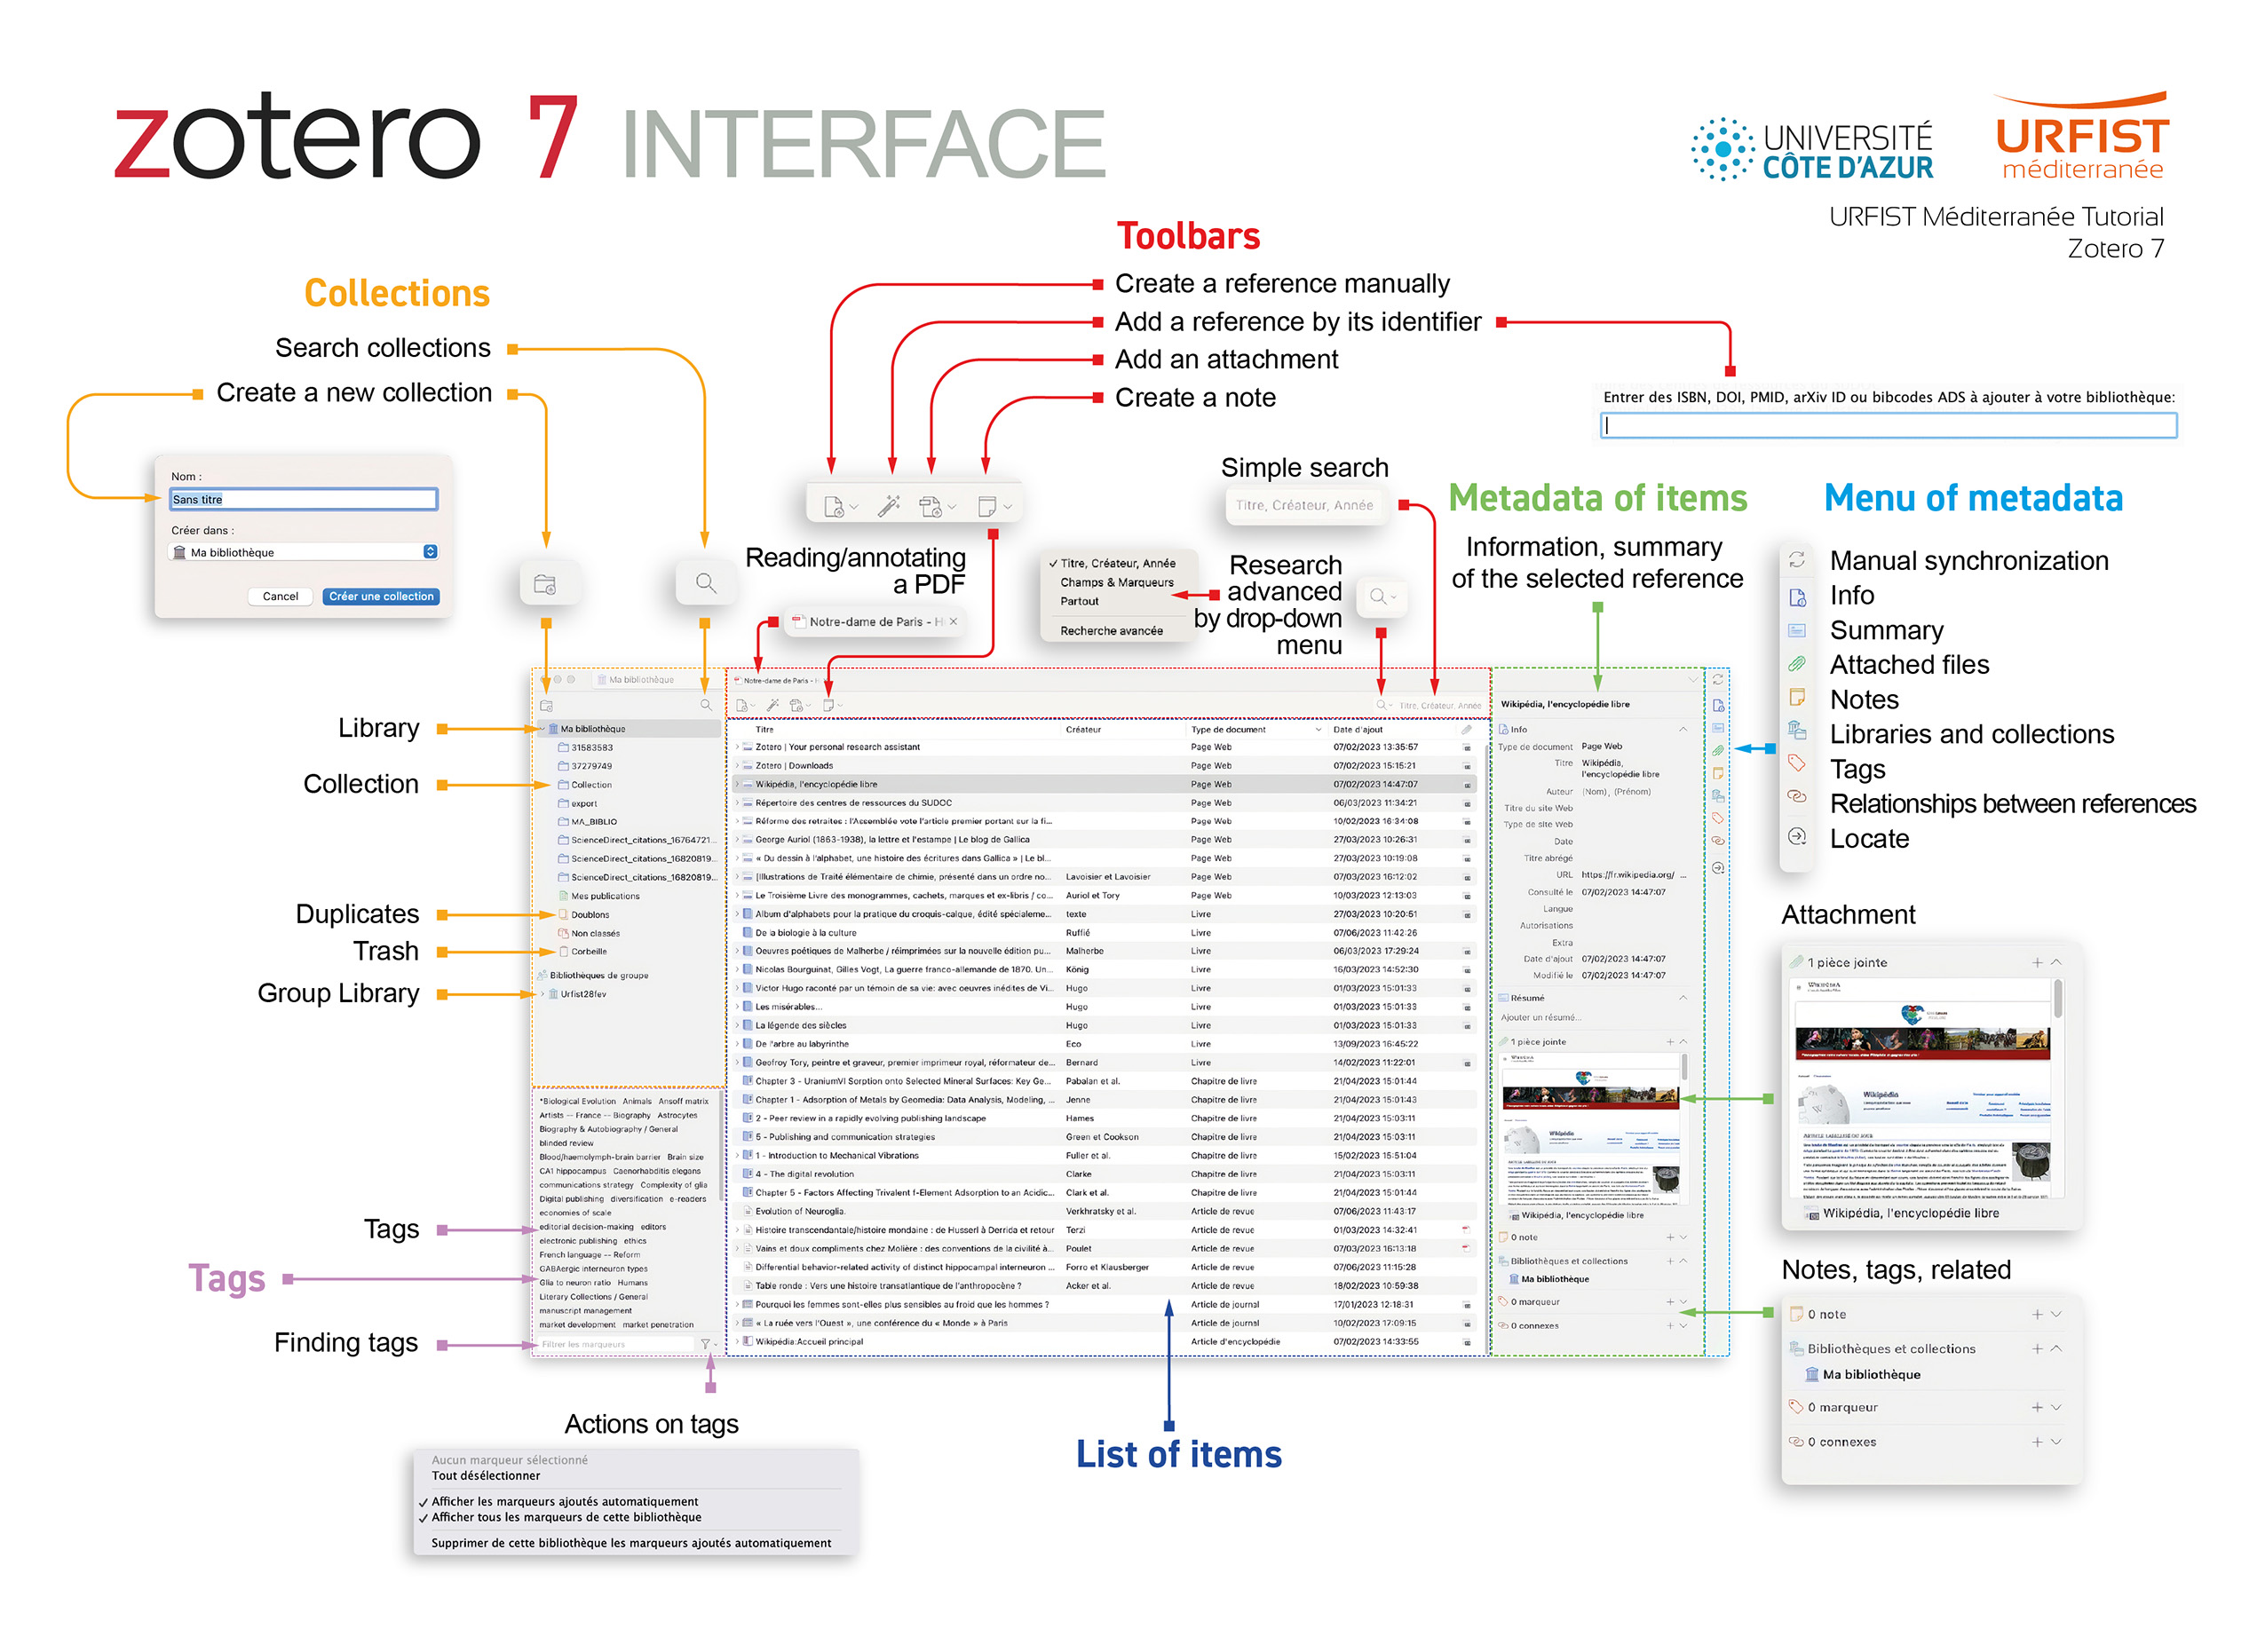
- Describe the Zotero interface
- Understand the layout and menus of the Zotero interface
-
Goals
- Collect references when consulting online resources
- Detect resources that do not work with Zotero
- Identify different collecting methods (not all of them)
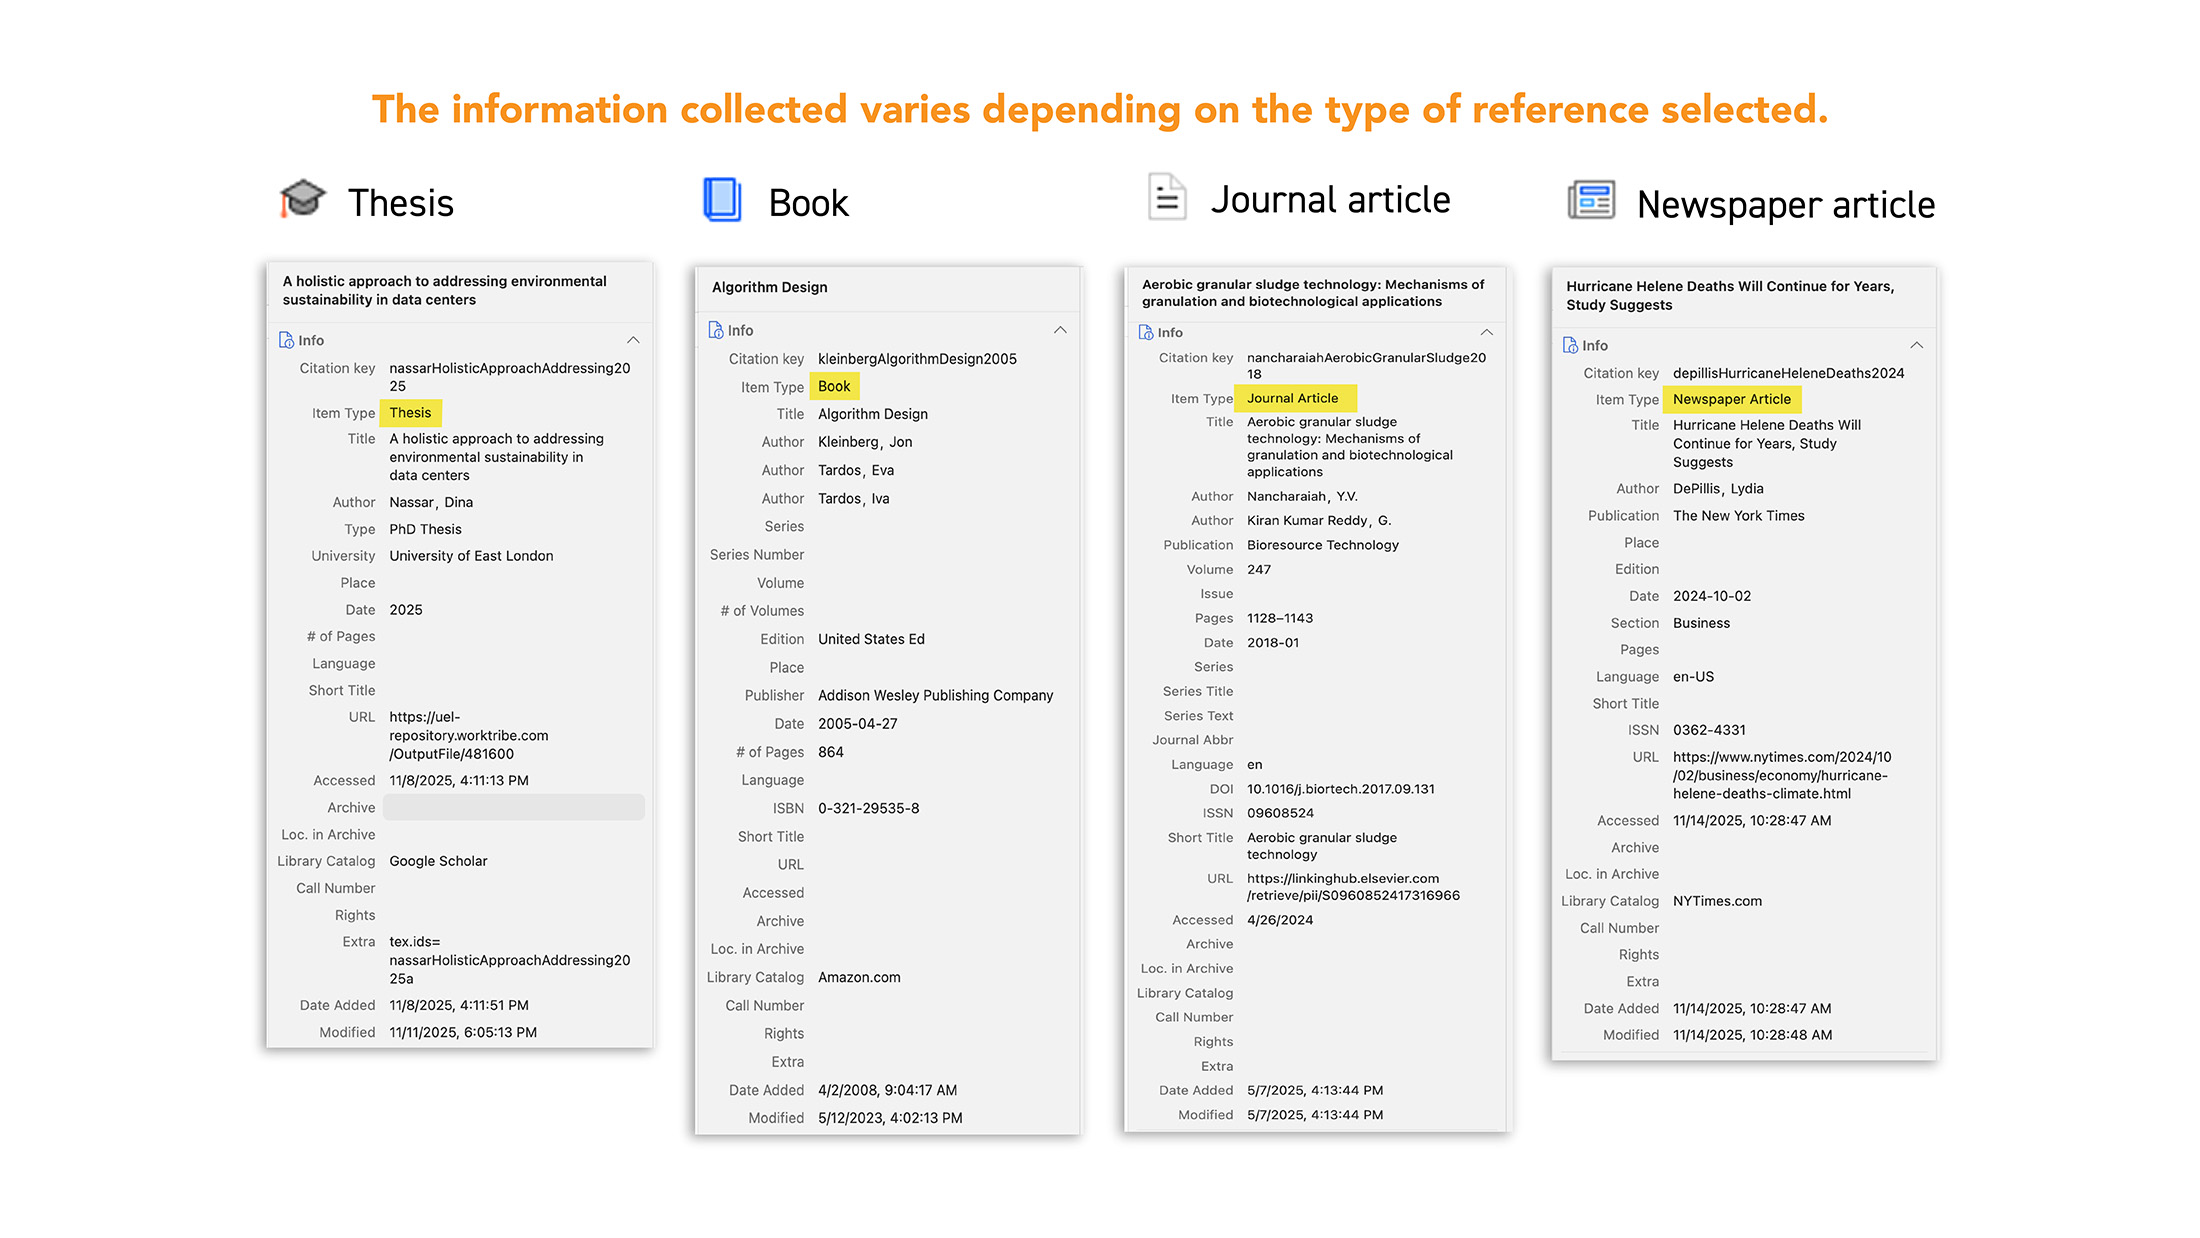
- Identify the type of document collected and the métadata to be completed, if applicable
- Explain why I can or cannot automatically collect the PDF associated with the reference
-
In a nutshell
Keep Zotero and your browser open : remember to keep the Zotero software and your browser (Firefox, Chrome, or Safari) open, otherwise you will not be able to save a reference in the Zotero software (the database).

Zotero alert message indicating that the software is not open.
You can pin the software or browser to your taskbar, but do not close or exit either one. Also, remember to manage your windows: do not use full screen mode, but rather multi-window mode so that you can easily switch between Zotero and your browser with a single click.
-
Icon variations
The video shows how references are integrated according to document type (a text in a journal, a book in the Sudoc catalogue) or via a Folder icon (several types of references on Google Scholar). It should be noted that different icons appear depending on:
- the resource consulted ;
- the specific page consulted on the resource.
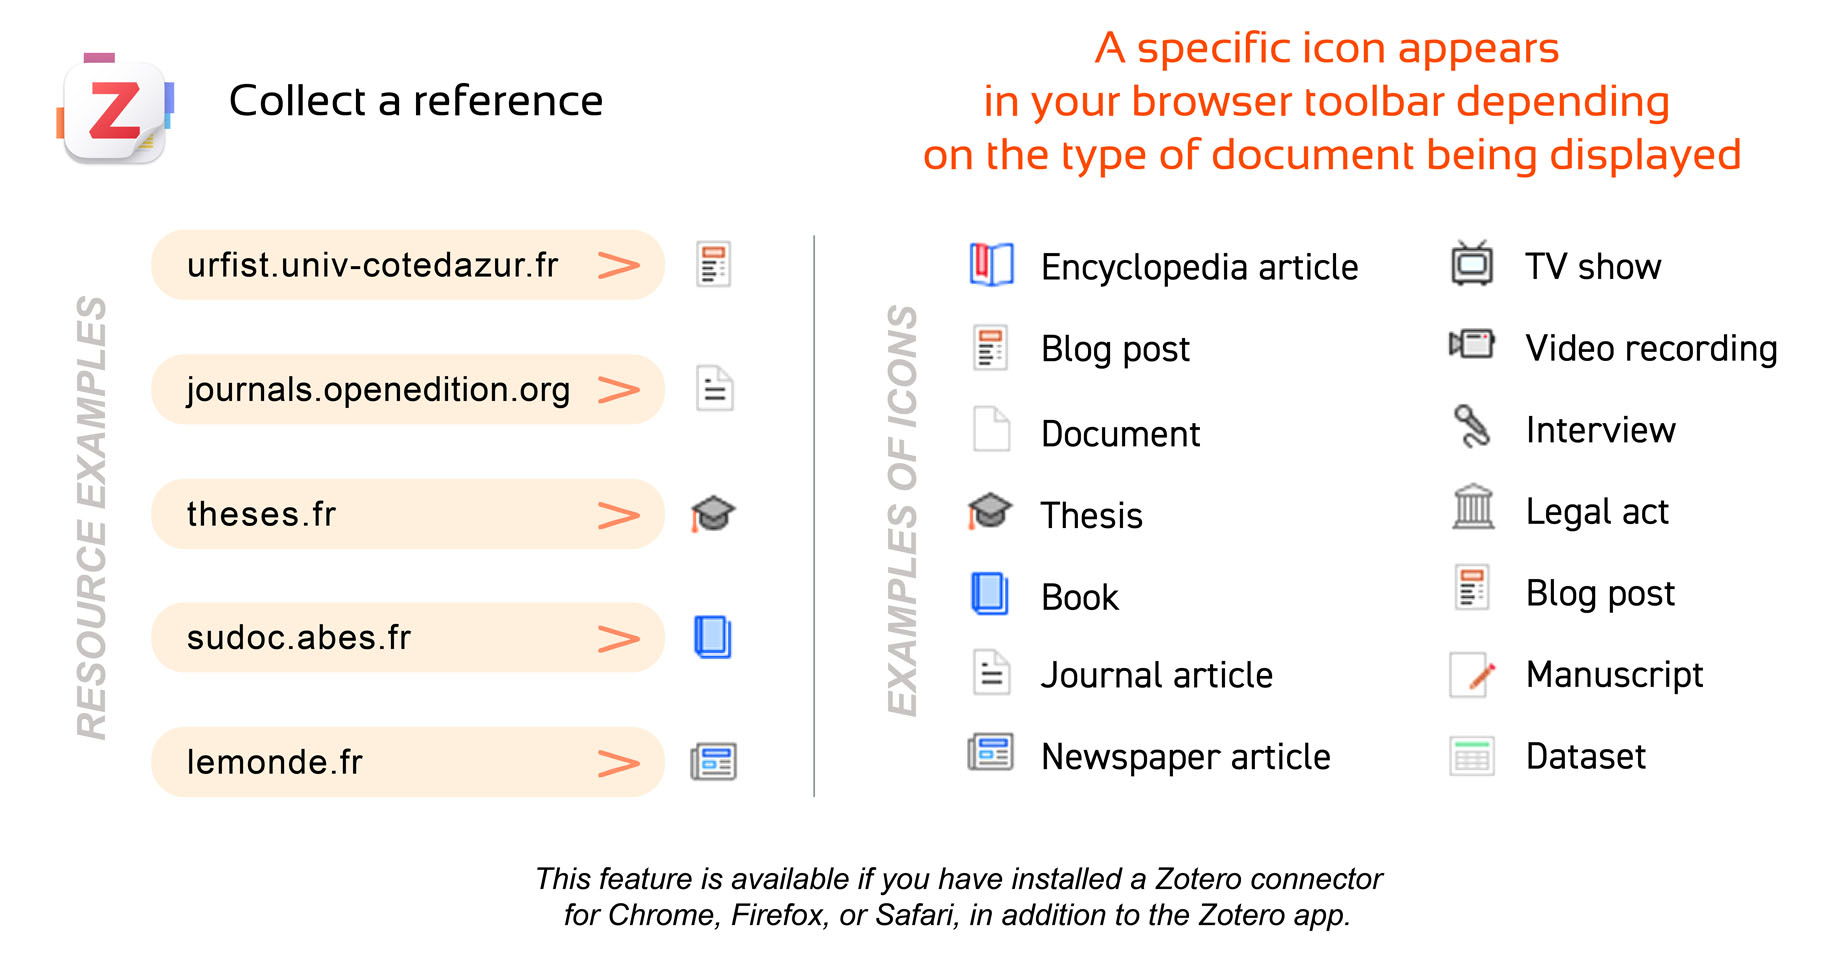
A custom icon appears in your browser toolbar depending on the type of document displayed.
To describe more precisely what is happening in the video, here are two examples below.
-
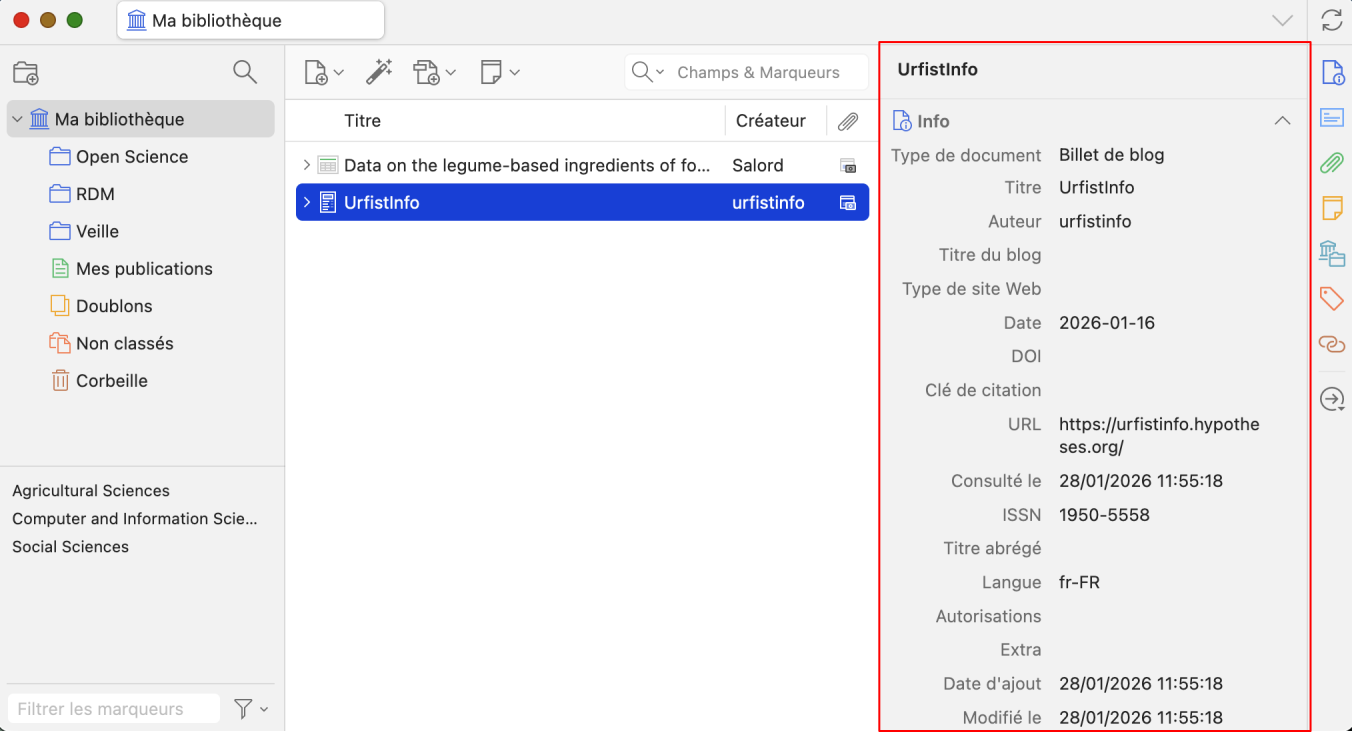
Example 1: the Urfist network blog homepage
When you visit the Urfist network blog page, the small icon indicates that it is a blog post from a web page:

By clicking on it, you add the reference to Zotero. Notice that in the right column, very few fields are filled in. However, this type of collection is useful for building a sitography/webography.
-
Example 2: Sudoc pages
When you browse the Sudoc (first example in the video), you need to search by keywords (according to your research topics). Below is an example using the keyword "serendipity".

A results list will display the first 10 bibliographic references, and page numbers will allow you to browse through the different results pages.
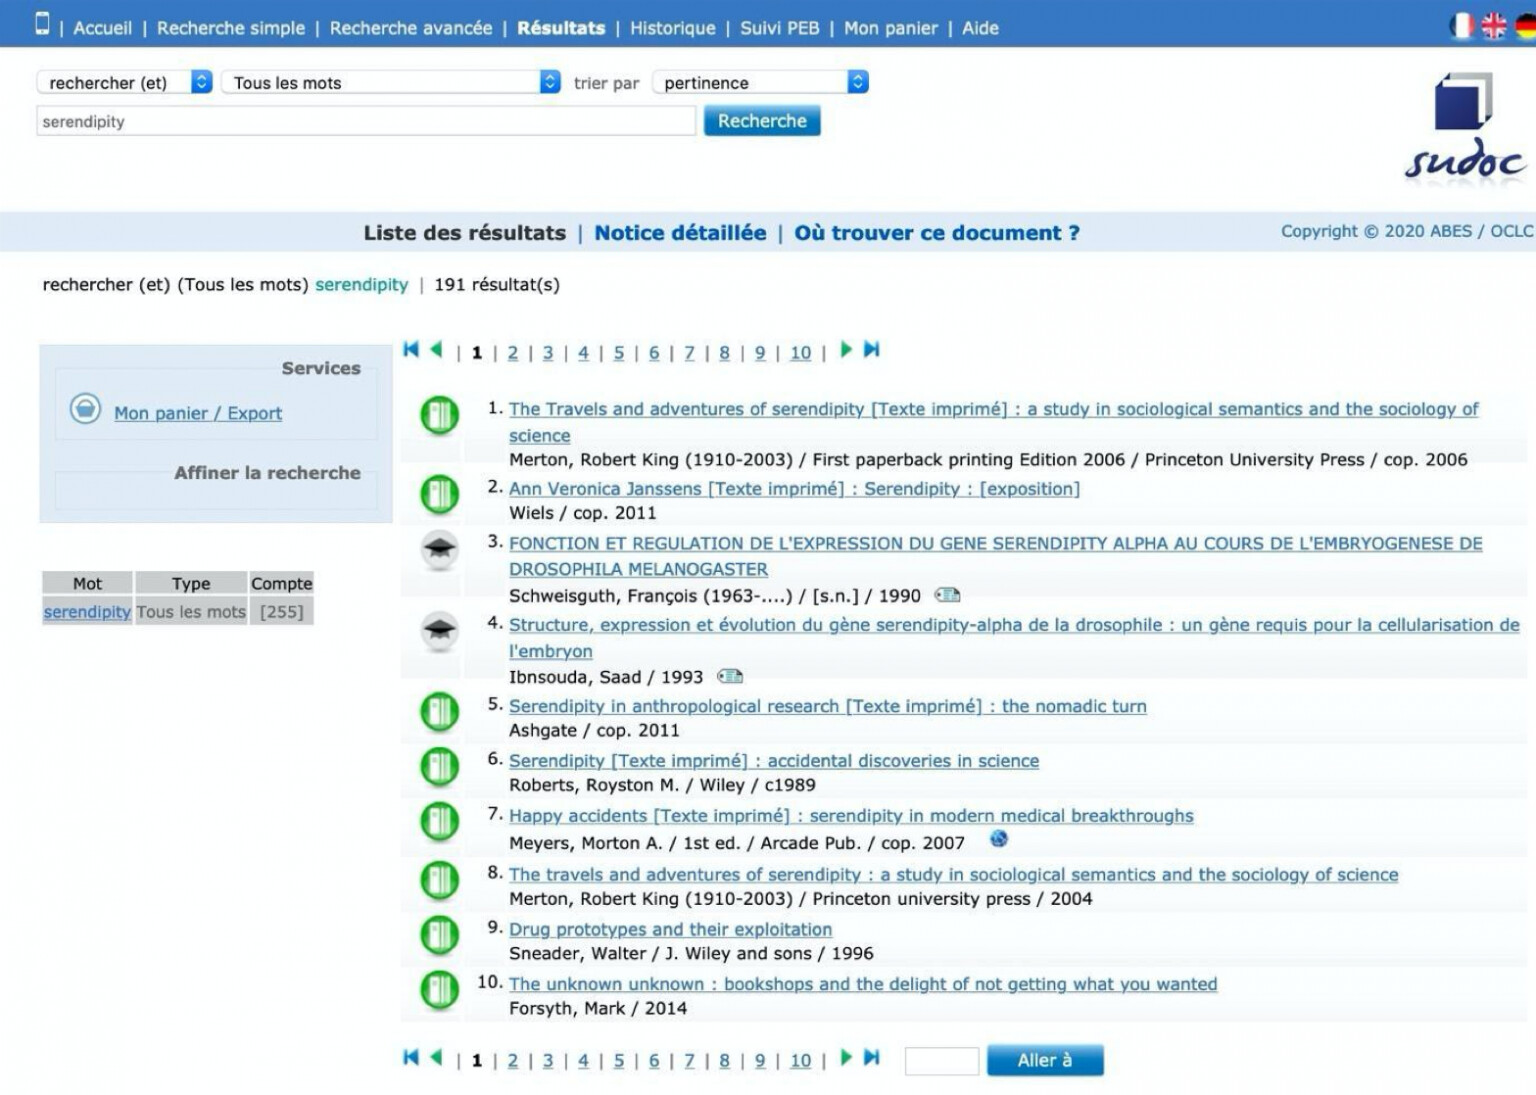
By selecting the first reference, the catalogue record for the book will appear.
You can add the book reference to Zotero by clicking on the "book" icon.
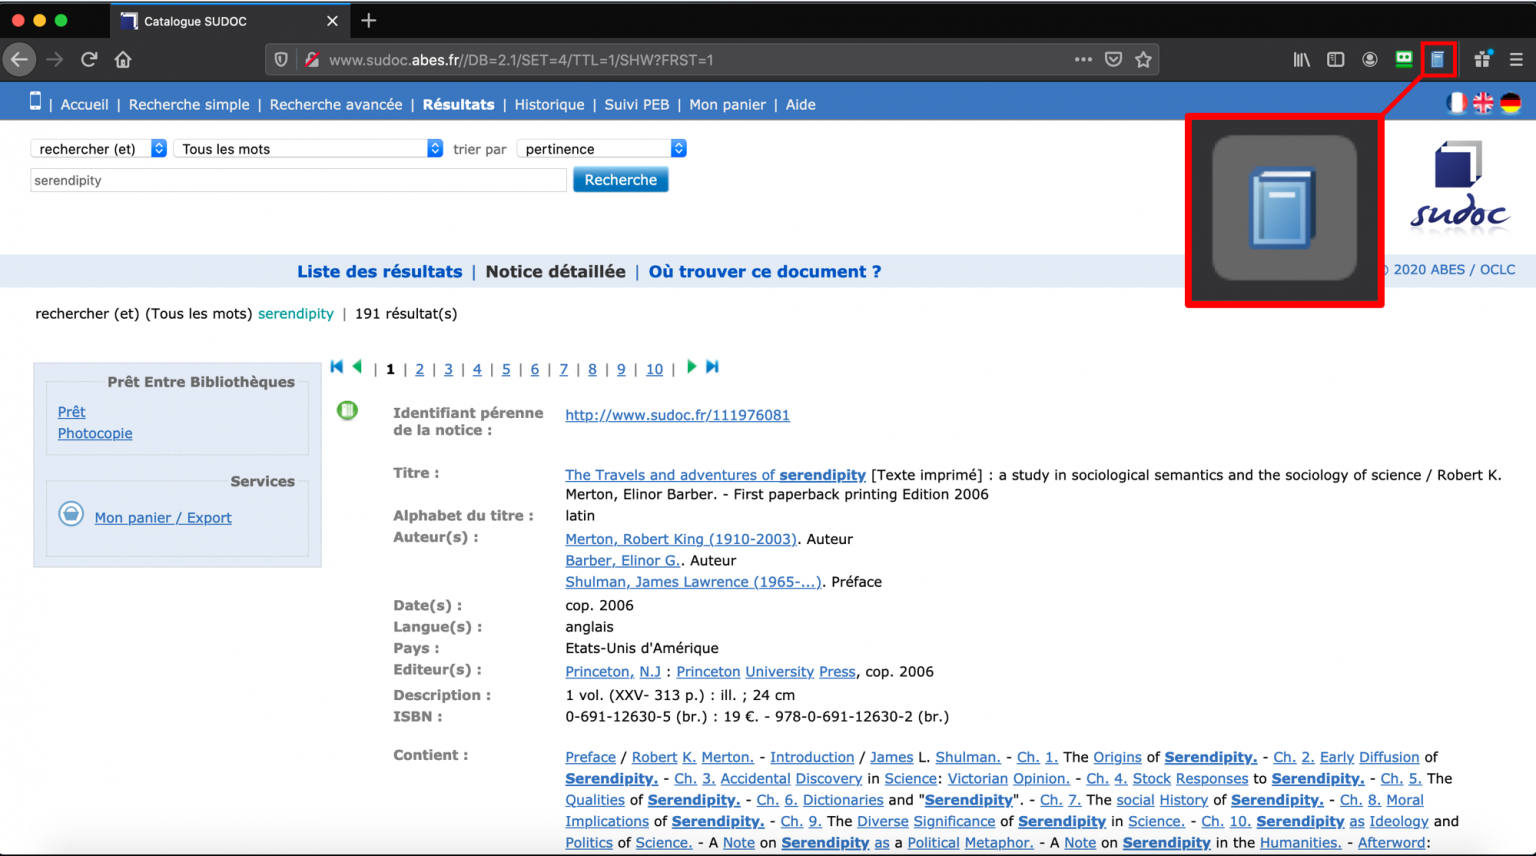
By clicking on the 3rd or 4th reference, a thesis record will appear, which you can add to Zotero by clicking on the "thesis" icon.

You can also try on HAL. Here again, the icon will change (journal articles, conference proceedings, books, etc.) depending on the type of document (i.e. the record) you are viewing.
The second example in the video uses href="https://scholar.google.com/" target="_blank" rel="noopener">Google Scholar. After performing a keyword search, Google Scholar displays the results (10 per page by default). The Zotero connector then displays a folder icon, which you need to click to open a window that lets you choose which references to add to Zotero.
-
What is not covered in the video
- Displaying a results list will generally trigger the appearance of the "folder" icon (see Sudoc above or Google Scholar in the video, but also on PubMed, HAL, and other resources that provide bibliographic references);
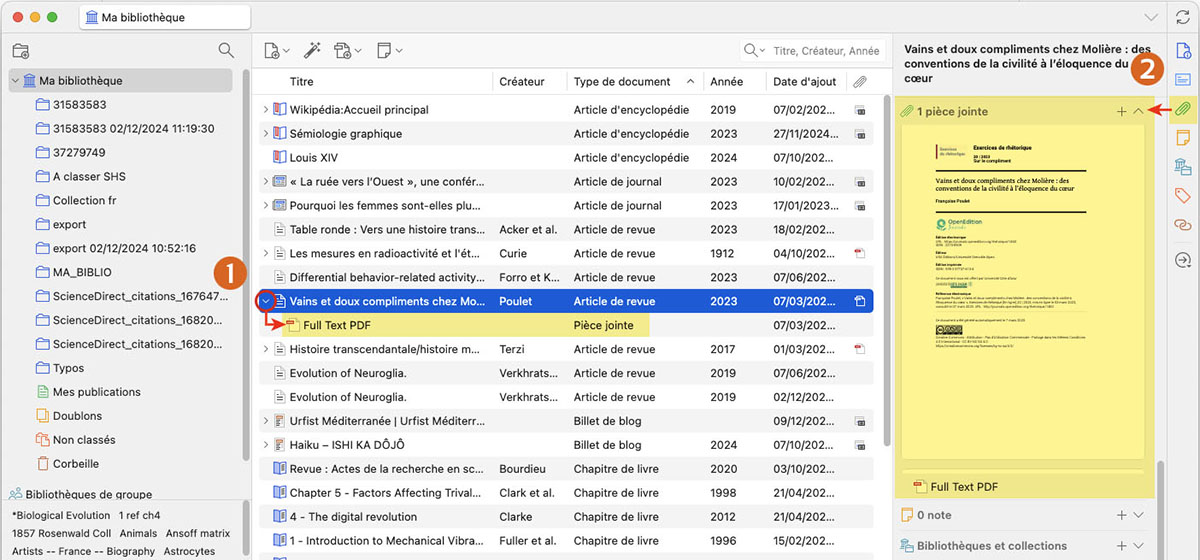
- When possible, i.e. when the resource allows it, in addition to the bibliographic reference, Zotero can also collect the full-text PDF linked to the reference. This is the case on HAL, OpenEdition, Google Scholar, and many other resources. To view the full text, click on ">" to the left of the reference (1) to expand it, or after selecting a reference, click on the attachment icon in the right-hand panel (2).
Some cases where it will not work
In most cases, Zotero will display the correct icon for collecting references. However, depending on the resources consulted, technical or commercial restrictions may prevent the collection of references and the associated full text (for example, Zotero will not work on Google, Dalloz, etc.).
Likewise, the quality of the collected references (i.e. how many fields are adequately filled in the "reference details" area) may depend on the collection method used ("folder" icon → from the results list, "document type" icon → from the individual record on the resource).
In short, you should check whether the interaction between the documentary resources you use and Zotero allows you to collect high-quality references. You may need to complete some fields manually.
-
Goals
- Explore the library
- Create a collection or a subcollection
- Add one or more references to a collection
- Remove one or more references from a collection or from the main library
- Rename or delete a collection
-
Goals
- Associate one or more notes with a reference
- Create tags with your keywords
- Associate a tag with multiple references
- Colour, rename or delete a tag
- Search for a reference by tags
- Remove a tag from a reference
- Sort your references by criteria
- Learn about simple search
- Manage duplicates
-
Goals
- Retrieve references in .ris or .BibTeX format
- Import references in .ris or .BibTeX format
- Retrieve references in .nbib format
- Import references in .nbib format
- Create a reference file in .ris or .BibTeX format
-
Importing and exporting bibliographic references in RIS or BibTeX format
These two formats should be considered as interchange formats, meaning they are standard formats for exchanging bibliographic references.
This method can be very useful for collecting a batch of bibliographic references either from a resource or from another reference management software (for example, when switching from EndNote to Zotero, from Mendeley to Zotero, etc.).
Just as you can import a RIS or BibTeX file, you can also export references from your library in RIS or BibTeX format.
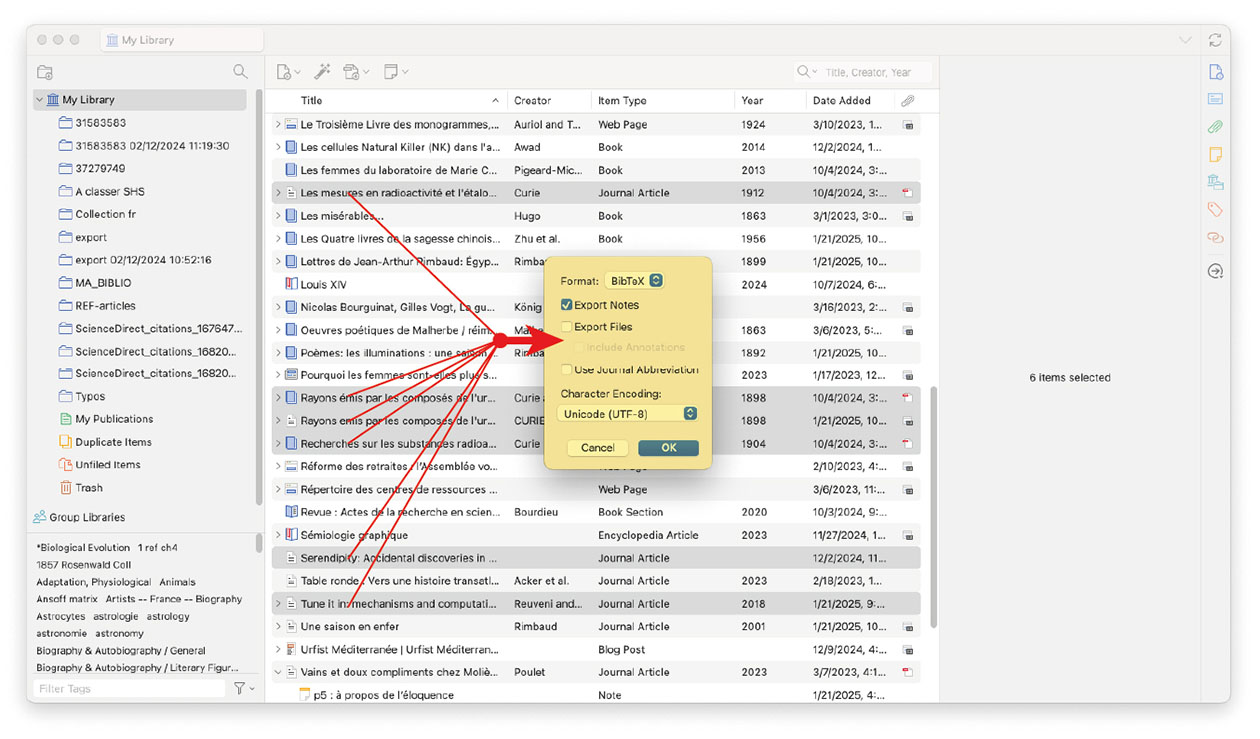
Select references in the central column, right-click on the selected references and choose "Export Items" from the menu (in Zotero, references are referred to as items). Choose the desired format, then click "OK". Finally, enter the desired name for the exported file (containing the references).
-
Goals
- Generate bibliographic lists with preferred styles
- Generate bibliographic lists in preferred formats (rtf, html, clipboard)
- Insert citation in the text I am writing to source my argument
- Generate a bibliography at the end of a text in the preferred style
- Change the bibliographic style in my word processor
- Know that bibliographic styles format citations, footnotes/endnotes, and the bibliography at the end of the text differently
- Add bibliographic styles in Zotero
-
In a nutshell
- You can generate a list of bibliographic references from a Zotero collection or from items selected in the central column (i.e. area 3, "reference list"). This allows you, for example, to produce a list of your publications, your lab's publications, or to provide your thesis supervisor with the bibliography (or at least part of it) that defines the scope of your research topic.
- Your references can be presented in different styles. A citation style defines how the various components of a bibliographic reference are displayed (see ISO 690-2 or Z 44-005-2 standards) — for example, authors in capital letters, date immediately after the authors, volume number in bold, etc.
- You can generate the bibliography of an article (or any other type of document) from the in-text citations inserted in the document you are writing in your word processor (only Word, LibreOffice, or Google Docs can insert in-text citations with Zotero to generate the final bibliography).
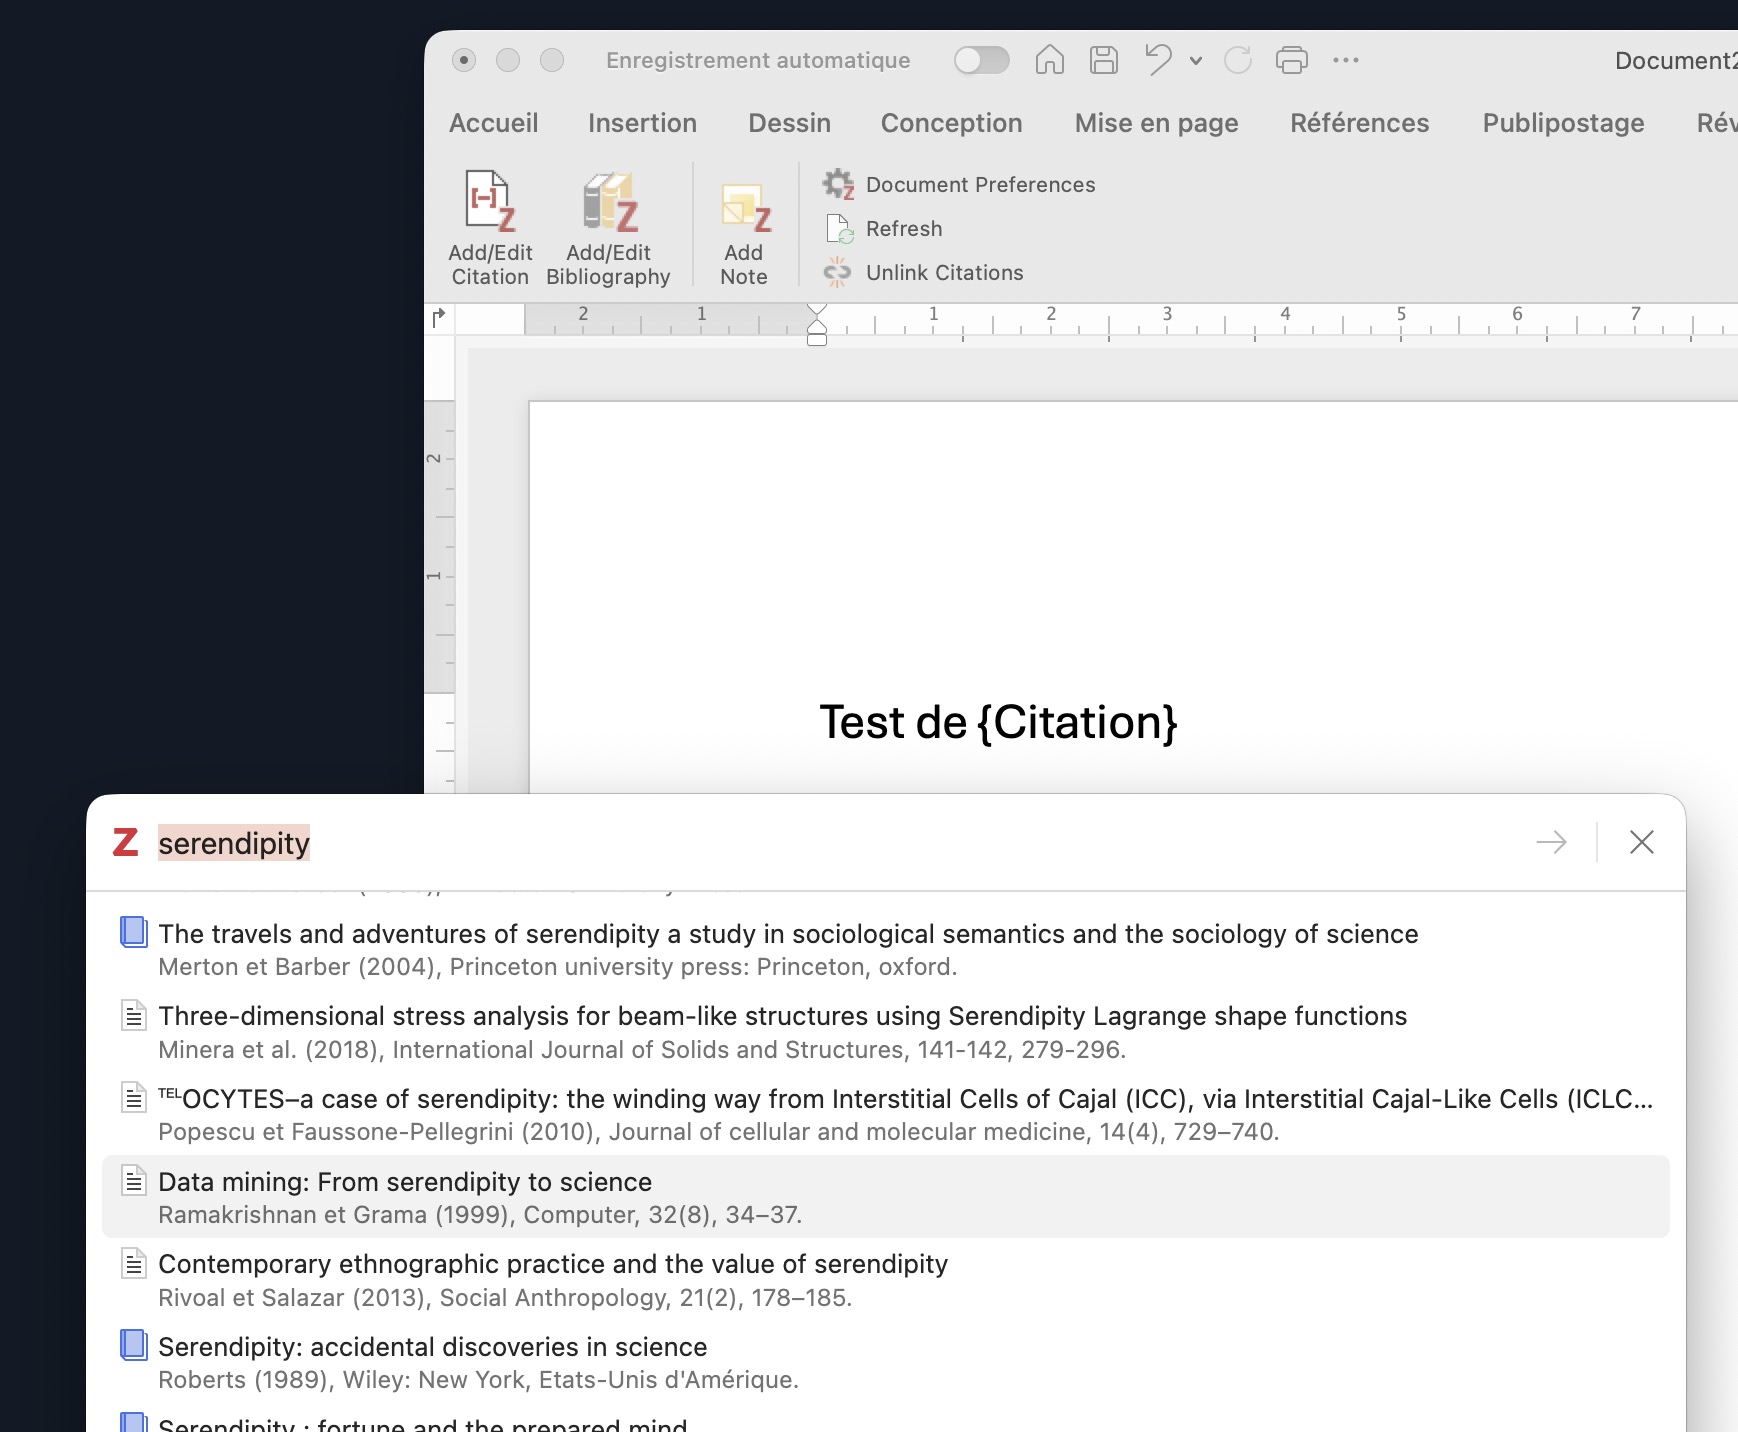
- Note that in the word processor, the Zotero menu includes an "Add Citation" button. This refers to the in-text citation, i.e. the reference(s) that support your statements or passages from one or more texts. Practices vary across disciplines.
- The reference/note insertion dialog box that appears should be considered as a window, so it may (depending on your actions) be hidden behind another window. This insertion dialog box allows you to search by keywords across all the records in your Zotero library.
By default, Zotero includes 15 citation styles. Some styles use footnotes, others list references in the order they are cited in the text, and so on — each style has its own characteristics. By visiting the Zotero Style Repository, you can import additional styles from over 10,000 available options. Simply click on the desired style, then click "OK" to add it to Zotero.
-
Additional Zotero training courses, from beginner to advanced level, are offered by the Urfist network. Browse the training catalogue and register on the Urfist Sygefor platform.
For doctoral students, you can access Zotero training courses through your ADUM account.